Automating Github FHIR Implementation Guide Builds
I have been working on a HL7 FHIR Implementation Guide for COVID-19 Case Reporting for an organization with a contract with the World Health Organization (WHO). Because of the distributed nature of the work (this being 2020, and all), we’re keeping the source for the Implementation Guide (IG) in GitHub. I got the build process working on my local machine, but I want to publish the output—initially this will be for team review, but I’m also thinking ahead to IG publication. HL7 has an automated IG build infrastructure that kicks off whenever you push a change to your GitHub repository. They also have documented processes for publishing that output, however their documentation is somewhat oriented toward HL7-produced IGs. In fact, reading through the various HL7 Confluence pages and other HL7 sites on IG construction, it is sometimes hard to identify which parts are specific to HL7 IGs, and which are for IGs in general.
The HL7 IG auto-build is great, and for many, may be all that is needed. The build results are hosted by HL7 under http://build.fhir.org/ig and a summary gets posted to the FHIR Zulip chat committers/notification channel (ig-build). However, the IG is only kept for a month or so before being deleted, and there isn’t a clear way to get the built IG off of the site. (Grahame Grieve corrected me; IG deletion only applies to branches.)
I decided to see if I could set up my own auto-build process that publishes to GitHub Pages.
Using the HL7 IG auto-build
Since the HL7 IG auto-build is so convenient and may be all that you need, let’s quickly look at setting it up before we dive into a custom auto-build.
- From your Github repository, go to “Settings.”

- Select “Webhooks” from the menu on the left.

- Choose “Add webhook,” and set the Payload URL to:
https://us-central1-fhir-org-starter-project.cloudfunctions.net/ig-commit-trigger
Set the content type to “application/json.” Use the default values for everything else.
- Click on “Add webhook” and you’re done.
GitHub will test the web-hook by sending it a ping. If all is working well, you should see a notification in Zulip within about 3 minutes. Following the links you can get to hosted IG, as well as the build QA results.![]()
(Hmm, looks like I have some IG errors to clean up still.)
Additional information about the HL7 IG auto-build is in the auto-build repository.
Setting up our own auto-build
If you decide that the HL7 IG auto-build isn’t sufficient, then you’ll want to set up your own. We’ll do that using a GitHub workflow action, and some of HL7’s build infrastructure. You can set up a workflow manually by committing an action file to the .github/workflows directory in your repository, but we’ll do it using the GitHub web interface.
Before starting this, remove the HL7 auto-build webhook if you’ve set it up; you won’t need it once you’re done, and you’ll trigger a bunch of unnecessary builds along the way.
- Before we really get underway, we need to set up your repository to publish to GitHub Pages.
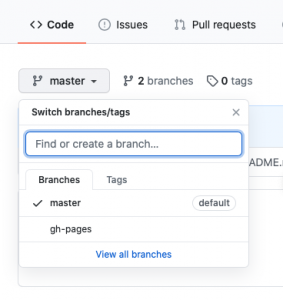
- First, create a branch in your repository called gh-pages.

- Then, go to the Options page of your repository Settings, and ensure your repository is has public visibility (it’s in the red zone at the bottom of the page).

- In the “GitHub Pages” section of Options, select the gh-pages branch, and save.

Now we are ready to set up the workflow.
- First, create a branch in your repository called gh-pages.
- In your GitHub repository, select “Actions,” then “set up a workflow yourself.”

- An editor opens up for
.github/workflows/main.yml. About halfway through the file (line 21) is the start of the steps to run, followed by a checkout action. Delete the rest of the file; we’ll replace the rest of the file with the IG build process.... # Steps represent a sequence of tasks that will be executed as part of the job steps: # Checks-out your repository under $GITHUB_WORKSPACE, so your job can access it - uses: actions/checkout@v2 - The HL7 auto-build already has a Docker image set up with the build environment, so we can leverage that. In that container, we grab the latest IG publisher tool:
- name: Update the image to the latest publisher uses: docker://hl7fhir/ig-publisher-base:latest with: args: ./_updatePublisher.sh --force - Although the publisher can run sushi automatically, the publisher needs ig.ini which sushi can generate. So, we invoke sushi manually here, and the suppress running it later. If your IG doesn’t use sushi, you can skip this step.
- name: Run sushi to generate the ig.ini file uses: docker://hl7fhir/ig-publisher-base:latest with: args: sushi - Now that we have an ig.ini (along with any other sushi-generated content), run the publisher.
- name: Run the IG publisher uses: docker://hl7fhir/ig-publisher-base:latest with: args: ./_genonce.sh -no-sushi - And publish the results to your GitHub Pages.
      - name: Deploy
        uses: peaceiris/actions-gh-pages@v3
        with:
          github_token: ${{ secrets.GITHUB_TOKEN }}
          publish_dir: ./output
This automatically commits the contents of your build output directory to the root of the gh-pages branch, replacing any previous content.
- The complete workflow script is:
# This is a basic workflow to help you get started with Actions name: CI # Controls when the action will run. Triggers the workflow on push or pull request # events but only for the master branch on: push: branches: [ master ] pull_request: branches: [ master ] # A workflow run is made up of one or more jobs that can run sequentially or in parallel jobs: # This workflow contains a single job called "build" build: # The type of runner that the job will run on runs-on: ubuntu-latest # Steps represent a sequence of tasks that will be executed as part of the job steps: # Checks-out your repository under $GITHUB_WORKSPACE, so your job can access it - uses: actions/checkout@v2 - name: Update the image to the latest publisher uses: docker://hl7fhir/ig-publisher-base:latest with: args: ./_updatePublisher.sh --force - name: Run sushi to generate the ig.ini file uses: docker://hl7fhir/ig-publisher-base:latest with: args: sushi - name: Run the IG publisher uses: docker://hl7fhir/ig-publisher-base:latest with: args: ./_genonce.sh -no-sushi - name: Deploy uses: peaceiris/actions-gh-pages@v3 with: github_token: ${{ secrets.GITHUB_TOKEN }} publish_dir: ./output - Save the workflow by clicking “Start commit”, providing appropriate comments, and committing to the master branch. Committing to the master branch should also kick off the workflow.
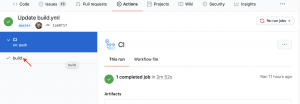
- Go to the Actions tab, and you should see the action is queued or in process.

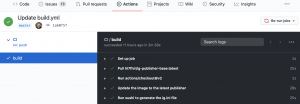
Clicking on the name of your commit, will take you to details. Clicking on the workflow name will give the log of the workflow. Expand each step to see details.
It takes a couple of minutes to run the build, and a few more to publish the output. And that’s it, you now have your own IG auto-build environment.
Next steps
Overall, I’m pleased with an evening’s effort, but there are some improvements I’ll probably be tackling in the next few weeks.
- Running sushi twice (once directly and once as part of the IG publisher) seems wasteful. I’d like to only have it invoked once.
- Each step actually creates a new instance of the Docker container, launches it, runs the specific step, and shuts it down. It would be nice to reuse the same running instance for all the steps.
- It seems wasteful to rebuild the Docker container, and to fetch the latest sushi and publisher builds with each run. I’m tempted to look at a way to cache those. However, I recognize that this process is only triggered on commit (which probably won’t happen often enough that the costs of fetching the content is an issue) and it is probably more beneficial to be certain that the workflow is using the latest infrastructure.
- Right now, the Deploy step deletes (git rm) all the previous content and replaces it with the current content. To do milestone releases (STU, release 1.0, etc.) I’ll have to figure out how to keep previous content and place things in the appropriate directories.
Finally, I’d like to thank Josh Mandel who gave me the initial direction to use the ig-publisher-base image, and pointed me at the gh-pages action. He also inspired me to take the time to write this up.
If you find this useful, or have suggestions for improvements or corrections, please let me know.
No Comments